|
Combo Boxes 102 – Building from Scratch
I love home-baked bread. About fifteen years ago I
actually tried to make some. Although it was an
adventure, the bread was dense and not very tasty.
About five years back, I discovered bread machines,
and boy was I in heaven. Dump the ingredients in,
turn on the machine, wait a couple of hours, and
voila---tasty warm bread. My family enjoyed it, too.
Although I was pleased with the bread from the
machine, it got a bit monotonous. I could vary the
ingredients, but I really couldn't easily control the
process or the shape of the final product. Last
winter, I took a bread making course at the local high
school. My eyes were opened to what real home-
baked bread was all about. The instructor taught us
about kneading, rising, yeast and other leavening
agents, shapes, ingredients, baking temperature, and
crusts (use a water spritzer in the oven before you
put the bread in to make it nice and crispy). My
knowledge and ability to turn out bread, just the way
I wanted it, was light years beyond what I was able
to accomplish with a bread machine.
Because of that course, I can now make much better
bread to suit my mood and the preference of our
guests (if you ever come over to the house ask for
the soft dough rolls – they're a winner.)
Last month we learned how to create a combo box
by using a wizard, a process very similar to using a
bread machine. We get a good product in the end,
but the amount of control and the ability to get
exactly what we want is severely limited. This month
we do the equivalent of moving from machine-made
bread to hand-made bread. We'll get exactly what
we want by controlling the process from beginning to
end – combo boxes from scratch!
| The Starting Point |
 |
|
Let's assume that we have the following table
containing campers at a fictional summer camp called
Camp Sunapee (it may look familiar because we’ve
used it in past newsletters):
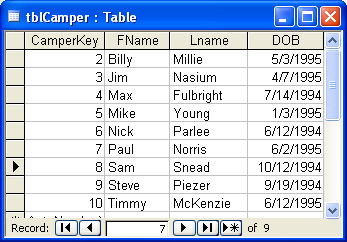
Let's say we want to build a combo (drop down) box
showing each camper in the format last name, first
name. What we want to get back when a user
selects the camper is the camper key as shown in
the first column. The idea here is that we'll store and
manipulate the camper key, a unique identifier, in
other parts of the program (and in future Access
Wizard newsletters). We’ll be able to use the camper
key to extract information of interest related to each
camper. This would not be an easy thing to do in a
wizard since we're not given the option to
concatenate fields (like last name, first name) during
the creation of a combo box. By creating the combo
box manually, we'll be able to create the exact
combo box we want.
Let's start with a blank form by clicking on the forms
tab, choose create form in design view, choose
design view again, and then click OK. Then select
combo box from the toolbox (for details see September
2005).
When you double click on the combo box on the
toolbar (see the illustration below
(200509Toolbox.jpg)
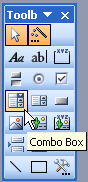
and then draw a rectangle on the blank form you'll
get the same dialog box we got last month. This
time, however, choose cancel so we can manipulate
the combo box manually rather than be restricted by
the choices the wizard offers.
|
| Combo Box Data Details |
|
|
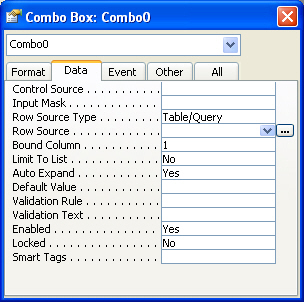
Right click the combo box and choose properties.
You'll get the following dialog box:
There are a number of tabs that we'll be delving into
in the coming months, each of which focus on
certain aspects and properties. For now we'll stick
with the data tab and concentrate on the properties
related to data and to what the user sees.
Two important attributes that influence both what
the user sees and the functionality of a combo box
are the Row Source Type and Row Source. The row
source type has three possible choices: Field List,
Value List, and the default Table/Query.
Let’s explore what these Row Source Type choices
can do for you as you build your custom combo box:
- Field List: this is a list of field names from a
table, query, or SQL statement specified by the
RowSource setting. This choice has limited value or
flexibility when designing a custom combo box.
- Value List: used with a predefined static list
of no more than about a dozen choices
(e.g. male/female, yes/no, cash/check/credit, or a
limited list of cabins at the camp). To enter a value
list, simply select Value List as the row source type
and then in the row source area type in each of
values separated by commas. I have to say I'm not a
fan of Value Lists because changing the values down
the road is a manual process.
- Table/Query is where the real action is
when building custom combo boxes! This choice
allows the maximum control and formatting over what
you show your users. It's also dynamic, which means
that as values are added and removed from tables
the items in the list change and grow according to
what is in the underlying tables. Since this is the
default for Row Source type we'll leave that as it
is.
If you click in row source after selecting Table/Query
as the row source type you'll get two possibilities: 1)
the downward facing arrow and 2) the ellipsis (...). If
you choose the downward arrow you'll be presented
with a list of tables and existing queries – don't
choose that because it will limit your ability to
control what you show your users. Instead, click on
the ellipsis and you be presented with the same
dialog box you get when you
start a new query from scratch. In our case we'll
choose the camper table, and from here you are in
your regular Query by Example grid. We'll make our
selections and build our query as follows:

Notice that I've selected the primary key as the first
column, and then concatenated the last and first
names (See the June 2005
Access Wizard to get the details on how to do
this). Finally, we've set the sort order on the Camper
name. When you run this, and I always encourage
many small tests along the way, you get the
following:
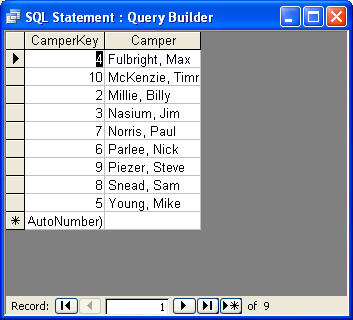
The important things to notice here are that the
primary key is in the first column and the complete
camper name (in concatinated form) is in the second
column. If you wanted to you could also add other
fields to the right to provide more information to your
users.
When you close this query you'll be asked if you
want to save it. Say yes and you'll be bounced back
to the form in design view.
To run the form, select View | Form View and click
on the downward black triangle and you'll see:
|
| Getting What we Really Want |
|
|
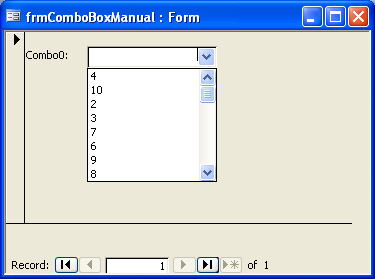
The picture above shows a series of numbers -- not
terribly helpful. What's
going on here is that the combo box is showing the
first column from the query you just built. It's easy,
however, to present results to your users that make
more sense. Go back to design view for the form
(View | Design View), select the combo box, and
open the properties window. This time click on the
format tab and make two changes:
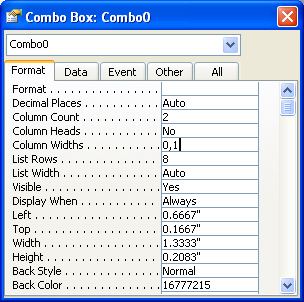
- Change the column count to 2. The column count
is the property that tells Access how many columns
the combo box should deal with. We're choosing 2
because we want to hold onto the primary key,
column 1, yet show our users the second column,
the one that contains the camper name. This number
can be altered to reflect your particular situation.
- Change the column width property of each
column displayed. Since our first column holds the
primary key, showing this to the user will do nothing
but confuse him. To hide it, simply set that column
width to 0, followed by a comma and the width of
subsequent columns expressed in inches (you can
use decimals to get fractional inches if you want). In
this case, we set the width for column 2 to one inch,
wide enough to display the camper names.
When we run this we get:
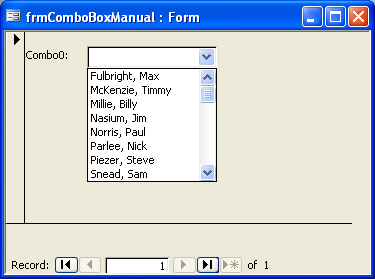
This is what we've been aiming for all along: a list of
our campers, showing both first and last name,
alphabetized by last name.
Throughout this issue, we’ve made an effort to
preserve the primary key as a field in the combo box.
In coming months, you’ll learn more about why we’ve
done this as we dive deeper into combo boxes.
|
| Trap of the Month – Don't Use Existing Queries as Sources for Combo Boxes |
|

Don't use existing queries as the source for combo
boxes. If you do, you're asking for trouble. The issue
here is that if you use an existing query, it's difficult
to tell where else in your application it might be
used. If at some future point you change the query,
for example changing the order of columns, changing
the sort order, or even deleting the query altogether,
your combo box will not work as intended. It’s likely
that you will get one of those nasty error messages
and not understand why. The same holds true for
saving your query if you create the combo box.
When you create a query for a combo box, don’t
save it. If you give it a name, it will continue to show
up in the list of all queries in your application, leaving
it vulnerable to potential changes.
The best way to deal with this is to simply build the
query using the ellipsis (...) from the property box
and
then just close the query when you're finished.
Access will ask you if you want to save the changes.
Say yes and the query will be saved along with
combo box, but will not be exposed in the general
query window. This seems confusing, and frankly it
is. When Access asks you if you want to save the
changes, it's really asking if you want to preserve
the changes you make. Explicitly saving the changes
however, will require you to give the query a name
which means it will then show up in your query list. I
know this seems not to make sense, its one of those
things that its best to just live with.
If you save the query only as you're closing the
query window and you ever need to make a change,
just open the properties of the combo box, select
row source, make your changes and close the query,
responding yes to save the changes.
|
|
Tip of the Month – There's More than One Way to Skin a Cat |
|
|
|
There are many ways to get property information for
an entity. This month when we wanted to manipulate
the properties of a combo box, I instructed you to
right click on the combo box and choose properties.
There are two other ways you could have gotten
there.
The first is to click on view from the menu at the top
of the screen and choose properties.
If you like
keyboarding your way around Access rather than
mousing, there's a nice alternative. You can use the
Alt-Enter keyboard
combination. In either of these cases, you have to
make sure that the combo box or whatever you
happen to be interested in is selected before you
choose the menu item or keyboard shortcut.
If you really like keyboarding and shortcuts check out
the May
2005 issue of the Access Wizard. I go into
detail there on some shortcut tactics and give you
some of my favorite ways to speed your way around
Access
|
|
