Let's go through it line by line. Our first order of
business is to create and define some variables to
allow us to respond to what the user has entered. To
see the basics of generating code and the use of
variables, refer back to the December
2005 Wizard. So we start with:
Dim strCity As String
Dim strSQL As String
You'll see how these variables are used as we move
through the code. Note that I'm using a naming
convention here as well as throughout the rest of
the code; to see more about why, check the July 2004
issue – Naming Conventions.
The next chunk of code contains two “If” statements
matched with a required “End If” statements. In this
example, you’ll see one If/End If set nested within
another If/End If set. Our first actual line of code line
is:
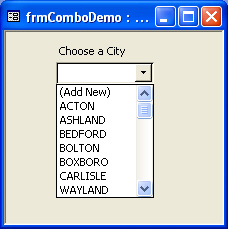
If Me.cboCity = "(Add New)" Then
This line, starting with an If statement, matches the
last End If statement in this section of code. It lays
out the action between here and the closing End If
only in the case that the user has selected the Add
New value from the combo box. If the user hasn't
selected Add New, the rest of the code in this
section is skipped over so basically nothing happens.
The user continues on their way, unaware that this
code exists behind the scenes.
Let's take a look at our next line, which is executed if
the user has selected Add New:
strCity = InputBox("Please enter the
new city name.")
This code presents our user with an Input Box asking
them to tell us the name of the new city, and we're
putting their entry into a variable called strCity.
Our next few lines say:
If Len(strCity) = 0 Then
'They have hit cancel so we do nothing
Else
This code executes if the user either enters nothing
into the input box (in which case the length of the
text string would be 0) or hits the cancel button. In
either case, the code will execute between the If
statement and the Else statement. Since the only
line of code between those two lines is a comment
(comments are preceded with an apostrophe),
nothing happens.
The next line is the most important of the code
because it sets us up to insert a value into our
lookup table:
strSQL = "Insert into tlkpCities(City) values
('" & strCity & "')"
This is an SQL statement (the code behind queries)
that says “take whatever they have put into the
input box and insert it into the City lookup table”.
SQL is a complex language that runs against Access
databases as well as most databases in use today.
It's a complex subject – for an introduction to SQL
code see the June 2005
issue – What's Really
Happening with Queries.
The SQL above is fairly simple and you can use it to
put a single value into a table. "Insert into tlkpCities"
says I want to put something into the table called
tlkpCities. The City in parentheses indicates that the
field that I want to add is City. If you were adding
more than a single field to a table you would include
them one after the other separated by commas. This
is followed by the word "values” and a string of text
between parentheses. This text indicates to Access
what you want to put into the field Cities. Within the
parentheses, you’ll see a single quote followed
immediately with a double quote. This is the only
truly tricky bit. Because the field City is a text field
(rather than a date or number field), SQL requires
that it be in quotes. (Note: if the value was a
number or a date, the single quotes would not be
required).
Then we have an ampersand, a concatenation device
that allows adding things together in our SQL
statement, followed by stCity.
Remember up above when we said : strCity =
InputBox("Please enter the new city name.")
Well here we're taking whatever it is that they told
us (our variable strCity) and adding it to the SQL
statement. This is followed by an ampersand and
then a double quote, a single quote, a closing
parenthesis and then a double quote to match the
double quote just after the equal sign.
This little complex bit is continuation of the string
(the ampersand followed by the double quote) a
terminating apostrophe for the name of our city, a
closing parenthesis for our SQL string and finally a
closing double quote.
This process to add new values to the table gets
fussy along the way so you may have to spend a bit
of time debugging. There may be shortcuts; see this
month's tip for an alternate approach.
The next three lines cause Access to take
action
DoCmd.SetWarnings False
DoCmd.RunSQL strSQL
DoCmd.SetWarnings True
The first line turns off the warnings so that the user
is not bothered with dialog boxes from the system.
The DoCmd.RunSQL strSQL says “take the
SQL statement and actually run it”. This is the line
that actually populates the table with the new value.
The third line is housekeeping. In normal
circumstances, if Access has a warning for the user
we want the user to know about it so we make sure
to turn warning capabilities back on.
From there the code closes with two End If
statements that balance out the earlier two If
statements.