|
Combo Boxes 103 – Finding Records the
Easy Way
Renewing your driver's license can be a major hassle. You go to
the registry of motor vehicles, guess which line to stand in (the
signs are small or non-existent), and wait while the ladies behind
the counter chat with each other. You finally get to the window
where you are treated as if you are an interruption.
At least that's how it used to be. The Commonwealth of
Massachusetts has made it much simpler to renew a driver’s license.
They send you a statement in the mail, you go to an Internet site,
fill out an on-line form, send in a check, and your new license
shows up in your mailbox. It couldn't be easier!
I also recently discovered that a visit to the Registry of Motor
Vehicles is a vastly different experience than I’d remembered. I
went to a registry a while back when one of my sons was getting his
license. We walked in the front door and were greeted by a nice lady
behind the counter who asked what we were there for. She gave us a
number and told us to watch an overhead monitor which would direct
us to the appropriate service window. After a short wait, the
monitor directed us to a line where we were treated as a customer
rather than an interruption. I'm not usually a big fan of
government, but the state of Massachusetts has certainly taken what
has traditionally been a dreaded experience and transformed it into
an event that was easy, fast and (almost) pleasant.
I tell you this story because I frequently see Access Forms that
are as unfriendly as the old style experience at the Registry of
Motor Vehicles. For example, a user searching for a record must
click on an icon of binoculars (how many new users would make that
correct association? Some, but not all!), fill in the correct field,
select the appropriate search strategy, and determine which
direction to search (up or down). This really demands a lot of the
user. This month we'll take the unfriendly process just described
and transform it using a combo box to make it much easier for users
to find what they seek.
| A “Before” Example |
 |
|
Let's say we have an application to keep track of summer
campers. We'll use the same data from a summer camp that we've
used in the past. Let’s walk through an unfriendly process to
search the form for specific campers, starting with a typical
form for this application:
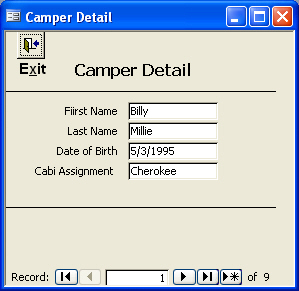
We have the basic detail here, and we can get to a record
we want a couple of different ways; we could click on the
little triangles at the bottom of the form to advance through
the 9 records in the database. Or we could click on binoculars
at the top of the form (they don't show here, but in Access
when the form is open as above, they're typically in the menu
bar at the top of the screen.) When you click on the
binoculars icon, you get the following dialog box:

The user must then type in the character string (e.g.
camper last name) they’re searching for. It must match
exactly, so you’ll have to spell it correctly (was that
McKenzie or MacKenzie?). Moreover, additional complexity is
caused by the row labeled ‘Match’ in this dialog box. This
drop down selection requires the user to declare whether they
want to match the entire field (whole field), the beginning of
a field, or part of a field (and what do all those terms mean
to the novice user, anyway?). I hope you’re getting the idea
that using this method to search in the database is confusing
and sets the user up for a frustrating experience.
|
| The Friendly Combo Box way to find |
|
|
Rather than searching using the cumbersome method described
above, wouldn't it be friendlier to present your user with the
following interface to search for campers:

In this scenario the user may either select the camper by
clicking on a name from the drop down menu or simply start
typing and the cursor will jump to the name of the camper that
matches the letters typed. When the user hits return or enter,
the form jumps to the right record. The user doesn't need to
remember if it's McKenzie or MacKenzie; he can conveniently
browse and select.
I won't go into detail about how to create the combo box or
how to populate the list of selections, because those steps
were covered in detail in the October 05 Wizard. However there
is one additional step beyond what was covered in the October
Wizard that you must implement to allow the user to find a
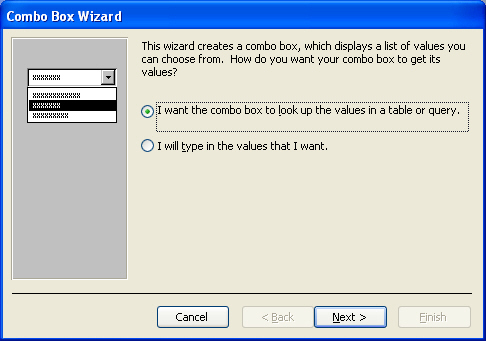
record on the form. When you first place the combo box in the
form you'll see:

Select the option "Find a record on my form based on the
value I selected in my combo box”. Then continue to follow the
prompts as outlined in the September
and October
Wizards. When you've completed this process, the combo box
wizard will create code that will jump to the proper record
once the user makes his selection.
If you don't see the option "Find a Record..." see this
month's trap below for a work-around.
|
| Conclusion and a Look Ahead |
|
|
What could be slicker than a friendly combo box created
with very little effort? Employing this technique of searching
for records with a combo box makes life much simpler for you
and your user. Rather than having to guess correct spellings
and wrestle with multiple confusing drop-down menus, the user
points and clicks and immediately goes to the record he wants.
This combo box that finds records is very friendly and
powerful. But what's going on behind the scenes? How does it
work? Next month we'll take a look at the code generated
during this process that makes this magic.
|
| Trap of the Month - The case of the Missing Find a
Record option |
|

Sometimes when you place a combo box on a form with the
intent of using it to find a record, you get the dialog box
below, which is missing the option to find a record selection.
This happens when your form is based on SQL statement
within the form rather than a query or a table.
I’m a big fan of SQL statements rather than queries since a
SQL statement with a form is much less likely to be changed by
accident, so I run into this problem a lot.
There are two ways to deal with this problem.
First you could temporarily save the SQL statement as a
query then use the query as the source for the form. When you
place the combo box on the form, you’ll then see that third
option "Find a record . . . " is available. If you take this
road I urge you to put the SQL statement back as the record
source for the form to avoid inadvertent changes in the
future.
The second solution, the one that I use, is to find similar
code someplace else in your application (do a search on the
word clone and you'll likely find it), copy that code and
adjust it so that it references the unique field on your form.
Of course if you have no other combo boxes in your application
that find records, this isn't very helpful; but stay tuned
because next month we'll take a look at the code in question
and once you've seen how easy it is to generate the code
manually this problem will be one you can solve with ease.
|
|
|
Tip of the Month – How to Draw a Truly Straight
Line |
|
|
|
When designing a report or a form, you may find yourself
wanting to draw a horizontal or vertical line. This is usually
a straight forward process. You just grab a line from the tool
box, click on your starting point, and drag to your ending
point. In most cases there are no problems. Every once in a
while though, you might run into the situation where the line
isn't quite level, it's just a bit higher on one side than the
other, and when you print the report the line looks either
skewed or bumpy. To fix this problem, you can try to drag one
side of the line higher or lower, nudging it up or down just a
little bit; however there's a much easier way to draw a
perfectly straight line.
Open the properties of the line (View | Properties) and
then set the height of the line to 0. This will ensure that
the line is perfectly level. |
|
